Pages

Wednesday, May 9, 2012

DiY Growth Chart

Updated*

I've received emails and facebook comments on if I make and sell the rulers...

1. Do I take orders?
I will make you a growth chart for $50. Because it is hand-stained and hand-stenciled, it will have slightly different knots and staining, but it will very much resemble my ruler. Shipping charges will vary depending on where you live, but I can check on pricing for you. 

Email me at benandtiffany@gmail.com. Include your zipcode and I'll be happy to check on shipping for you. UPS direct offers the most competitive prices for boards (typically $35-$40) and usually delivers within 3-4 days. 
Thanks!

I'm so excited about my Pottery Barn knock-off ruler growth chart!!
It's a great way to keep up with your child's height and looks good enough to display in the main part of your house (versus hiding it in your kid's bedroom).
I put mine in the hallway off of my kitchen.  
I first stained my 1x8x6 piece of wood and made stencils for the lines and numbers. I made the "quarter" lines 2 inches long and the "eighth" lines 1 inch long. I drew in all of the lines and numbers first with a pencil and then came back with a permanent marker.
(Not a difficult process, but a little tedious.)
I wanted to hang my ruler (as opposed to leaning it), and since I have tall baseboards, I started my marks at 6 inches. So my ruler actually measures up to 6 1/2 feet tall.


My kids were confused/excited/proud of their new ruler the minute I hung it up.
If Davis could talk he would say (like my husband did), "Why is there a ruler hanging on the wall?)

Sweet Sydney gets excited over just about anything. 
And Addi can now prove that she's the big sister.

Man I love these kids!! When I have a chance, I plan to go back to their growth charts to mark down their heights up until now. And the best part about the ruler is that it's portable..from this wall to another wall or from this house to another house. Thanks to 517 Creations for sharing your idea!


Tuesday, May 8, 2012

Chalkboard Wreath

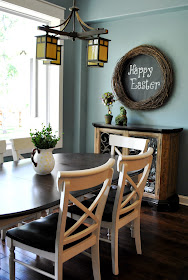
I made this chalkboard wreath a few weeks ago for a client of mine. 
We used it to stage her kitchen since we didn't have enough time to find a larger buffet for this wall. 
 Here's how I made it.
Can you tell it's dark? It was the night before her corporate event.
Nothing like a little pressure, to get a project done!

I measured out the size of my wreath. The picture is kind of deceiving, but this is a very large wreath. About 50 inches in diameter. I traced a circle on the plywood to where I thought was the middle of the bundle of twigs, so that the plywood would extend under the wreath but not come out from the side. Does that make sense?
 Before cutting out my circle, I drilled 4 holes. One in each corner of the circle.
 I then cut out my circle. Nice and even. 
 I painted with chalkboard paint.
I don't suggest the spray paint. I hear that it doesn't go on as smooth.
 The next morning, I used floral wire to secure the board to the wreath. 
Cut a foot long piece of wire. From the front of the wreath, push both ends through the twigs. Have one end go through your pre-drilled hole and have the other end go through the twigs just on the outside of your plywood circle. Repeat for each hole at each corner.
 Now that both ends of your wire are at the back of your board (one through the hole), pull them tightly together and twist them like you would a bread bag twisty. Cut your wires and tuck the ends back up into the wreath so that they won't scratch the wall when you hang it. 
I also used wire to make a hanger for the wreath. 
Cut a 6 inch long piece of wire, find a secure twig and tie both ends down about 3 inches apart.
 And there you have it. A great piece that can be changed out for the seasons.
Now I just need to make one for myself! :)


Sumo's Sweet Stuff

Thursday, May 3, 2012

The Finished Dining Room {Finally}

If you haven't forgotten all about us here at That Village House (due to our utter lack of attention to the blog) you may remember a few months ago I shared with you the beginnings of my dining room makeover. I first told you how I envision things with blue painters tape.  Then I shared my plan of action with you.
Remember how it started?
It was a neglected room at the front of our house... the first thing our guests saw when they walked in the door.  I was fed up with how it looked and once I had a plan {and my husband was on board} I quickly got to work.

I gave you the tutorial here of how I transformed the walls of the room using board and batten.
I also made a plea for someone to sell me the Rowley Creek Double Bookshelf that matched my table and has been discontinued. 

So, I lived with a room that looked like this for quite a while.
I searched the internet for the right curtains to bring to the room.  I knew they had to have color and had to have pattern since everything in the room was neutral and 'plain'... thanks for pointing that out, Mom!

I finally landed on these beautiful curtains from Pottery Barn. 

I am usually ALWAYS very thrifty and so spending a ton of money on curtains is never something I do.  After begging my friends for a Pottery Barn coupon that wasn't being used and having success (Thanks, Sarah!!) I ordered these and anxiously awaited their arrival. 

Back to that long blank wall in the back....
I really needed something to go here and planned on searching for something great and unique at Round Top in April.  I was still scouring Craigslist just in case someone was selling something that would work.

I'd been searching for months for my beloved Rowley Creek Double Bookshelf and almost made a Spring Break trip to Colorado to pick up one that a furniture store's website claimed to exist (false advertising... out of stock!!). 

I used the search feature on Craigslist - "Rowley Creek", "Ashley", "Double Bookshelf"... NOTHING to be found.  I searched nearby Houston, Dallas, Austin, etc.  NOTHING.  I called around to any remotely close Ashley Warehouse to see if by chance they had just one of these things laying around.  NOTHING. 

Then the heavens broke forth and the Lord heard my cries... okay, so it wasn't THAT SERIOUS...but man alive, you'd think I had won the lottery the day I found IT... the piece I was dying to have...the one that I thought nothing else could compare or replace. 
I'm not even kidding when I tell you I couldn't call the Craigslist seller FAST ENOUGH.  Nevermind that I literally had a sleeping 4 year old on my chest {Sidenote: It will never get old to have one of my sleeping babes cuddle in for a catnap}.  I called the lady in an almost panic/emotional/"I've got to have this piece" state.  I actually told her in the message I left "I HAVE TO HAVE THIS PIECE"... so much for room for negotiation.  I showed her all my cards {Sidenote: my husband was disappointed in my tactics...he's taught me everything I know and I blew it...haha}.  We made arrangements to drive an hour or so to Cypress pick it up (along with a matching table and chairs that I planned to resell).  George & I  called it a date and made our way sans kiddos with a trailer to pick up my newest pride and joy. 

And guess what y'all... it DID NOT FIT!

So, my incredibly sweet, loving, generous hubby went back the next morning at 6am with a college guy and a different trailer to pick it up.  Let me just tell you... he's pretty much the best around. 

Now, if you have hung in there long enough to make it this far on this post.... Here's the room reveal.  It's 90% complete... You'll see what I mean below.


This room has probably become my favorite in the whole house.  I'm so happy with how it has turned out.  The last finishing touches will be replacing the frames on the wall of our kids to be larger to fill the space better and maybe figuring out something to use as a tablescape.  For now... I can check this off my list of the house "to-do's".


Wednesday, May 2, 2012

My new favorite piece!

This 2-tiered table was love at first sight! 

I have a feeling I'll be changing it out with each season/holiday, 
so don't be surprised if you see it here again :)

For now it looks like this.

Tuesday, May 1, 2012

Little Man Party

Our little guy just turned ONE! 
We threw him a manly birthday bash full of ties and mustaches. 

I used my silhouette machine and cute cardstock to create some simple decorations.


My sweet friend Monica made these ADORABLE tie cookies!
They not only looked perfect, but tasted delicious!

I set out some snacks.

And added some mustaches to the juice boxes.

I set out nose glasses & dress up hats for the kids to play with. Along with these lips and mustaches that my daughter helped me make. So fun!


The kids also played Pin the Stache on Davis. I made the big kids go blindfolded of course!
While the kids were entertained, the adults played Name that Stache. 
I printed out pictures of celebrities from the nose down (some easy, some hard), held each up for a few seconds and had everyone write down who it was. Our very own, Lindsay Jacobus was the grand prize winner! That People magazine subscription is paying off :)

Each of the kids went home with a goodie bag full of toy cars and lollipops with, you guessed it, mustaches on them.

It was a fun, EASY party that I think everyone enjoyed, 
including the man-of-the-hour, my sweet Davis.