Pages

Sunday, November 28, 2010

A Merry Welcome!

So here is my first Christmas project for the year!!
I saw something similar at our church's Advent celebration & pretty much straight up copied it. I couldn't help it. It was love at first sight! I plan to make a 2nd stack to go on the other side of my door, so I'm not completely done, but I thought I would share it with you anyway.
I started with 3 different sized boxes...9, 12 & 14 inch cubes.
I used an ice pick to punch holes in each of them so that I could run a rebar through them. (It's easier to do the holes first, before getting them all wrapped & pretty.) For the smaller boxes, I slightly off-centered my holes, so that the boxes would tilt on each other.
Then I wrapped them and made bows for each.
Tip: Keep your wrapping paper pattern running the same direction.
Tip #2: Before you poke holes through the paper, put a little tape on it. It will help the paper from ripping.
I also made sure my seams were right down the middle of the boxes so that the ribbon would cover them up. And I used double-sided tape to hold the ribbon and bows in place. I'd love to take credit for these tidbits, but again, I straight up copied this idea!!
What do you think?? I can't wait to make the other stack!

Saturday, November 27, 2010

Spotlight Sunday {Lindsay}

Kristi at The Speckled Dog put together this cute ribbon wreath. It looks super easy to make too! Really great use for all those fun ribbons I've been seeing.

Look at the adorably fantastic wreath Natalie at Johnny In A Dress put together. I can't think of another place that I'll need a wreath this year...but if I did I'd for sure try something like this!


Tuesday, November 23, 2010

My China Hutch

Do you remember the wall of white plates that you helped me with a few months ago?? Well, I still love it!...
But it left my china hutch looking like this...Yikes!! I'd like to think that it looked better when ALL of the plates were in there, but looking back at this picture, I wonder if it even looked good then! Talk about being white-washed!
So I pulled everything out this weekend and started from scratch. It's funny how the idea of having company motivates me to finish projects like this!
I shopped the house and found some warm-colored pretties that seemed more Fallish. I also stole these wood paintings from the living room. The pastels fit better in here. Especially if you could see the curtains. I'm too lazy to go take another picture, so you can see them here if you'd like.
This basket and garland became my no-fuss table centerpiece.
Whew! Much better. My dining room is now ready for Thanksgiving guests!
Are you doing any last minute re-arranging??

Monday, November 22, 2010

Finally finished!

Remember the girl's room that I've been working on??
Well, I'm finally done!!

I found this picture on Simplified Bee and was completely inspired! I love the combination of blues and pinks. It's girly without being too babyish. Plus, I'd already painted the knock-off version of the Pottery Barn bird painting, so it was really just meant to be.
The Serena & Lily bedding, while beautiful, didn't exactly fit my budget. So I used this light blue comforter & sheets from Target. And I found this GREAT coordinating pillow at TJMAxx. Her black bed (which you'll see when you scroll down) is 1 of the 2 that I bought in Round Top.

For her nightstand, I grabbed this piece from the mud room. Since it was already painted blue & provided 4 more drawers, it was really a no-brainer. I brought back in the painting and flower lamp and added a crate of books on the floor for easy access.
I kept my younger daughter's bedding pretty simple. The coordinating blue pillow is the "container" that my older daughter's comforter came in. I just stuffed it with stuffing and re-buttoned it. I had intended to bring in the other matching black bed, but reconsidered after realizing that the old crib would make nap time and bed time easier for now.
And here's a few more pictures of the finished room...
I love how it came together but love even more, that it's done! :)
I'm linked to...
The Girl Creative
toolsareforwomentoo

Friday, November 19, 2010

Blank Walls are my decorating thorn!

Long blank walls... they give me major decorating stress (if there is such a thing!). I used to complain in our last house that I didn't have enough wall space. It seems that our current house has made up for that ten-fold! I have recently been rearranging some things in our house which has created more decorating disasters and dilemmas. Both of which involve LONG LONG BLANK WALLS. What to do, what to do?!

Because I now have this little sitting area off my dining room.

I now have this disaster in my living room. I've hated this wall since day one. I applied the vinyl words in the wrong spot and compensated for them by adding the crosses. Then I added the big square piece that is now in the sitting area. Now I need to figure out what to do with the entire wall -- removing the vinyl and the crosses. My two thoughts: 1) plate wall - but it will have to be pretty big 2) beadboard on the bottom half & three large portraits or "things" above it. Either way I think I'll be painting the wall a darker color and eventually I'll paint the secretary to the far right a red color.

Because I moved the lamps from the living room and the office.

I now have this blank desk space. The lamp used to take up a good portion of the height on the wall and I had my diploma hanging next to it. That looked silly all alone on the wall so I moved it.
This is the rest of the same wall. I also dislike it. I would like to have a small sofa/love seat and move the chairs. This is the first room you see when you come into my house...and it gives people the wrong impression about me. It appears totally undecorated so it looks as though I don't care... when in fact I DO care but just haven't got a clue as to what to do! HELP! :)
Remember when you all helped Tiffany with her decorating dilemma? I would really love some advice on both walls.

Thursday, November 18, 2010

Alright Alright... I Caved!!

After seeing all these cute coffee filter wreaths on all sorts of blogs I decided to try it out for myself. It didn't take too long and I'm pretty happy to have it finished.

I had the perfect night to work on this project. My husband was out for a few hours and I had some Dancing with the Stars to catch up on.

I gathered my supplies... a straw wreath (with the plastic still on), natural colored coffee filters & my trusty glue gun.

At about this point I had throbbing fingers from the hot glue mishaps and was really regretting my decision to begin this project. I even thought of stopping and finishing it later. But since I know myself so well I realized that I may have a 1/2 finished wreath NEXT season so I pressed on through the pain!

I'm not sure where its final home will be. For now it is hanging on our back door to the garage. All in all I am pretty satisfied with it!
By the way... this project cost me $3.48!!! Wreath was $3.47 and on sale for 40% off. The coffee filters were $1.40. Not bad!
Linking Here:

Wednesday, November 17, 2010

{Recipe} Nacho Chicken

It's about time that we had a recipe to share with you! Does this mean that we haen't been cooking much? Well I can't speak for Tiffany...but I for one have needed some motivation! This week I made one of our favorite meals... Nacho Chicken.

Gather your ingredients:
1 Chicken (or 4-5 chicken breasts)
1 bag Doritos (nacho cheese flavor)
1 can corn (whole kernel)
Cheese (grated; to taste)
1 small onion (diced)
1 can cream of chicken soup
1 can cream of mushroom soup
1 cup milk
1 can Ro-tel tomatoes

Boil and debone chicken. Layer chicken, Doritos, cheese, onion, and corn in casserole dish. Mix soups, milk and tomatoes. Pour over casserole. Top with cheese. Bake at 375 degrees for 30-45 minutes.

Enjoy!

Linking here:
Someday Crafts
My Backyard Eden
The Trendy Treehouse

Monday, November 15, 2010

Go Big(ger) or Go Home

I have a problem... I tend to think too small when it comes to decorating.
I have had these lamps on our nightstand for the entire 7 1/2 years we've been married (yay for me for longevity!). The problem is they are just too small for the space. I also had grown tired of the shade and the style of the lamp base. I see lots of lamps at Marshalls & TJ Maxx that are super cute, but I just can't justify spending the money to replace something that functions fine... but isn't decorator savvy.

I've recently rearranged some furniture in the living room and sold some things on Craiglist which left me with one of two matching lamps needing a new home. I thought I'd give it a try and see what I thought about it being in the bedroom.

Once I decided I liked it and that it would stay, I had to steal the matching lamp from the office so I could have the same size lamps on each nightstand. I thought I'd taken a good picture of 'before' the new lamps...but all I found was this one. And I am too lazy to put the old ones back just for a photo! :) Hopefully you can use your imagination as to what it looked like.

BEFORE

AFTER

What do you think? Are they too big? Do they need new shades?

Sunday, November 14, 2010

Spotlight Sunday {Lindsay}

I think I am going to eventually, one day, sometime, maybe soon make one of these cute coffee filter wreaths. Colleen put this together from CoBabe in Suburbia
What a cute idea for a faux pumpkin. The Scrap Shoppe created this. I'm not great at keeping real flowers alive so I think it may be real cute with faux stems to use year after year.


This adorable yarn wreath that Lisa at Recaptured Charm created. I love how unique it is and it looks fairly easy to create.

That's all for today... hopefully now my creative juices will start flowing... I am out of ideas. Hobby Lobby here I come!

Thursday, November 11, 2010

Advent table

Have you broke out your Christmas decor yet??
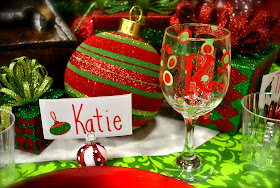
All of my pretties have already found their way out of their plastic tubs & onto this table that I decorated for Advent at our church last night. Check it out!
It was fun and easy to throw together...
I used candlesticks, that I borrowed from my mantel, as the table's main centerpiece. I decorated 2 chargers with Christmas presents, ornaments, etc., and temporarily secured them to the candlesticks using tacky, floral tape. It was one of those look but don't touch types of things!
I set the candlesticks on some crates (that I got in Round Top) to add just a few more inches of height. I used wrapping paper for the placemats & spread out more pretties to hide the crates and tablecloth.
Each guest received a handmade, very imperfect, wine/water glass that I personalized with their initial.
They were also lucky enough to partake in the cake pops that my friend Misty & I worked so hard on! Yum! They were almost too cute to eat!...Almost!!
It was a great night and a great way to set the mood for the Christmas season!
And now that it's said & done, I have to admit that I'm fighting the thought of having to pack everything back up till after Thanksgiving!
Is early November too early??

giveaways