Does your fridge look like this?
I love to have pictures on the fridge, but usually keep them on the sides because of the clutter it creates. By using old photo frames that I already had, I created a more polished look for my pictures. You can easily purchase frames from goodwill or garage sales for the same purpose. I intend to add more - but these two were all I had on hand that weren't being used currently.
Here's how to do it:
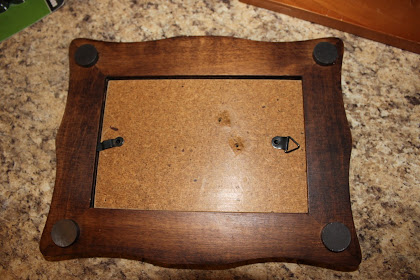
Take any frame and remove the easel part on the back.
Purchase magnets that will be strong enough to hold. These are from Hobby Lobby and they have the rating of "6" on the package. These worked for me (four per frame). I attempted this project in the past and did not buy the right size magnets so make sure you pay attention to that detail!
Use a glue gun to place one magnet on each corner.
Friday, June 18, 2010
Saturday, June 12, 2010
Crafty Friday - Topiary Tree
Ever since my trip to Canton a while back I've had this glass dome that I intended to put an ornament stand in with a seasonal ornament....like this.
Unfortunately the dome I bought was too skinny and too short (hasty purchase!). So, it's been sitting empty on my bookshelf ever since. I decided I just wanted a topiary tree to sit inside of it. But have you seen the prices on some of those tiny topiary trees?? And I knew that I'd have to have one that was 'just right' for my dome. What are the odds??? Enter crafty Friday....
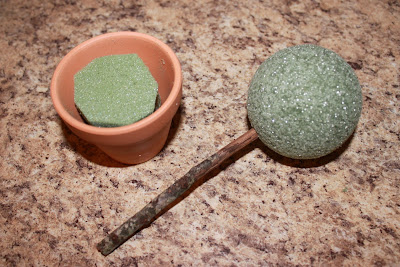
I went to Hobby Lobby and bought some materials to help me out with the project. You'll need a boxwood plant, foam floral balls (or shape of your choosing), moss and some sort of container. For the stick...you could buy one - or check your yard for one (which is what I did).
Use floral foam to fill the pot so that your stick has somewhere to 'stick'. I had some of this already on had so no need to buy it again... FREE! :) Push the stick into the ball and you're ready for tedious step #2.
Cut the boxwood plant into tiny sprays like this.
And start sticking them in! Remember this WILL take a while.
Hot glue the moss around the base of your tree and you're finished!
Now the new home for the tree filling up the glass dome just right.
How much did this cost for ONE tree?
Floral foam ball $.80
Terra Cotta pot $.42
Boxwood spray $3.99 (and I have over half left)
Stick: FREE
Moss: FREE (I ended up having some so I can return what I bought)
GRAND TOTAL: $5.21
**to all my local friends. I have 5 balls and 4 pots (one broke!) so if anyone wants to make a tree... let me know.
Friday, June 4, 2010
Where it all began...
We bought our current house in May 2009. The previous owners had their son and four of his college buddies living here. Needless to say, it was a house that you had to see WAY beyond the current condition to see any potential. We had looked at so many houses that we were pretty certain what we wanted. As soon as I walked in to this place I knew... This is IT!
The biggest change had to come in the kitchen. We didn't have the money to gut the whole place so we did the following changes. After it was all said and done you may have thought we gutted the place. But we are penny pinchers and stretched our dollar as far as we could.
{removed the L-shaped counter}
{removed the soffit above all cabinets}
{replaced the countertop}
we went with laminate over granite saving over $2000
{replaced the flooring}
we installed laminate wood (and have since ripped it out for tile)
{replaced the faucet and sink}
husband found deals on that by buying directly from a plumbing supplier instead of a Home Depot or Lowe's
{replaced all appliances}
under $1700 for dishwasher, double oven, microwave and cooktop. we have found that if the $200 job will cook/clean just as well as the $800 job we'll keep the $600 in savings for other things.
{new doors and hardware for cabinets}
{new 12' section of upper and lower cabinets from the dishwasher on}
{installed ceiling fans}
the galley style kitchen was a really hot place with no circulation. while i dreaded putting up the fans, i'm really happy with them now.
{replaced back door and pantry door}
again buying through a supplier we replaced both doors for under $70
{installed beadboard backsplash}
eventually we may do tile..but money ran out and i had seen this option. it's worked well for our family and was probably under $100
{new coat of paint on everything}
The bulk of the work was done by my husband and some of our church friends and family. We hired out the cabinets, flooring and countertops. Once these changes were made it felt like "home" and just the way we'd imagined.
Before (with the guy's stuff!)
Thursday, June 3, 2010
First Post
Well this blog started out of trial and error. I wanted to update the fonts and design of my other blog and all the websites I checked out suggested creating a new personal blog to play around with. So, I figured... I may have something else to write about that one day people would care to see or know. So, here goes...
This blog will be to write about all things home related
{decorating}
{recipes}
{design inspiration}
{design wants/needs}
{and anything else I feel like writing about}
Hopefully you'll come along with me on this journey and see where it takes us!
This blog will be to write about all things home related
{decorating}
{recipes}
{design inspiration}
{design wants/needs}
{and anything else I feel like writing about}
Hopefully you'll come along with me on this journey and see where it takes us!
Subscribe to:
Posts (Atom)