Showing posts with label Thrifty. Show all posts

Tuesday, November 29, 2011

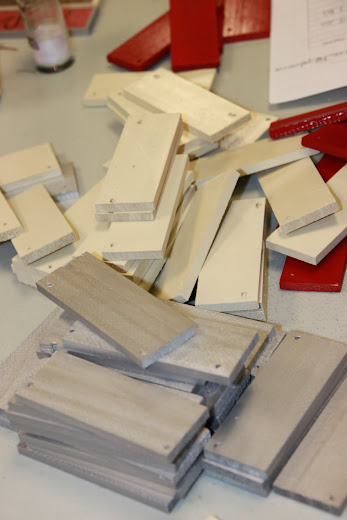
Paint Stick Ornaments

I told y'all yesterday when I shared with you the cute snowman gift tag that I'd be showing you some of the crafts that our Bible study did for our "Super Saturday". Today's adorable idea was found through Today's Fabulous Finds. Who'd have thought that making ornaments out of free paint sticks could turn out so cute?

You can find the tutorial here. Or if you're really good at figuring things out from pictures read on... haha.


Have your paint sticks ready in various colors (ours were red, cream and grayish silver).


Gather your supplies. The template for the words can be found here.


Put it all together and here's what you'll get. Super cute and super inexpensive ornaments for your tree or for gifts!


Friday, September 16, 2011

Round Top roundup!!

It's that time of year again!!
Round Top's Antique Show is only 1 week away! Can you tell how excited I am?

If you're not familiar with Round Top, let me enlighten you.

Round Top began almost 30 years ago (in it's tiny town of now 81 people!) as a TRUE antique trade show. Think estate jewelry, chandeliers, silver and such. But over the years a ton of “me too” shows (featuring anything & everything other than antiques) have sprang up in surrounding areas. 4 small towns: Round Top, Warrenton, Carmine and Shelby now make up the main event. So much that people may say they're going to "Round Top" for the weekend, and not actually shop IN Round Top.

How big is Round Top?? No one actually knows. The last calculation accounted for over thirty-five separate shows hosting over 2,500 dealers! It's absolutely crazy. There are tents and tables set up as far as you can see covered with every household good you can possibly imagine! Furniture, plants, dishes, window panes, iron works, benches, jewelry, road signs, hardware, puppies, clothes, birdhouses, mirrors, rugs, collectables, candles, JUNK, barstools, beds, paintings, old desks...you get the idea! Anything and EVERYTHING.
It's every woman's dream & every husbands nightmare!

But let me reiterate "JUNK". There is a TON of it! You'll walk by some tents bewildered by some of the stuff they're trying to sell. But "junk" is also the term my sweet husband uses for most of the goodies I come home with! Weathered & beaten treasures that I plan to paint, improve or just leave as is.

Here are just a few things that have made it home with me...
Shutters: After power washing and spray painting, they now house artwork
Pumpkins: They were already painted. The urn is from Sam's Club.
Twin beds: Painted and distressed
The blue ladder: left it dressed, just power washed it
The 2 topiaries
Lindsay's dresser: painted and distressed. What a deal!

So when is Round Top? The "antique weekend" traditionally occurs the first full weekend of April and October each year. TRUE antique lovers flock to Round Top in search of their expensive goodies. But the shows in surrounding towns (like Warrenton) actually last for 2 weeks. Years ago, vendors began setting up their stuff the week before the show during what they called the "preview weekend" and so many people showed up early to shop that the name stuck. Here is a link to the calendar, showing which booths are open during preview weekend and which are open during antique weekend. Most of them now cross over into both weeks.

Where to begin? Unless you love real china & silver, skip all of the antique tents and head straight to the new stuff that looks old. That's where the good deals are made. When Lindsay & I go, we spend 95% of our time in Warrenton. Drive straight through Carmine & Round Top and don't even start looking for a field to park in until you get to Zapp Hall.

What to expect: Wear comfortable shoes. Bring cash! Some places take credit cards but will bargain more if you offer cash. Parking is $5. Bring a list of thing your looking for & your measuring tape. Take bottled water. Bring a truck with bungee cords for all your treasures. Bring an open mind. And leave your kids and pets at home. :) It's just too chaotic.

So have I convinced you yet? Do you have it on your calendar?
Get some girlfriends together and make a trip of it. You won't be disappointed!

Friday, September 2, 2011

Another find on Craigslist

Do you like my new end table??
I bought it from a sweet college student a few weeks ago for $10. That's right! $10! It costs me more to eat at Chick-fil-A!

Here's what it looked like when I bought it.

I spray painted the bottom off-white...

and replaced the knob with a $2 one from Hobby Lobby
that I painted & distressed.


And then accessorized with living room knick knacks.


I like the price & my hubby likes a place to set his drink :)
Thank you Craigslist.


Linked here:


Thursday, August 25, 2011

DIY Cafe Shelves...Ballard Knock Off

Remember last week when I told you I'd figured out what would go on my long blank wall in the kitchen? Well, here they are!!

I was inspired by some pictures on other blogs like this one and this one and some photos on pinterest to build my own knock-off Ballard Designs cafe shelves. I'm here today to share with you how I did it!

Let's remember what I was starting with... {sorry for the dark photo}

I used painters tape to measure out how long I wanted the shelves to be and about where I wanted them to hang so I could live with it for a few days to make "sure" that's what I wanted to do.


Once I was decided it was off to buy my lumber.

I decided on one 3' and one 4' shelf.

So, I bought a 8' long 1x8. I purchased door casing for the trim. I knew I'd need 7' for the fronts of the two shelves and about 8" for each end. At Home Depot you can purchase the trim by the foot so you can buy just the amount you will actually need. I think they come in 12' long strips. I found two that were already cut and in more manageable lengths.

I also picked out four corbels for my shelves to mount on. These were about $6 and the most expensive part of the shelves. I've seen other bloggers mentioning buying 2 for $5, but I didn't find those. :(


The first thing I did was use my mitre saw to cut the 1x8 into my two desired lengths... 4 ft & 3 ft.

Then I measured my door casing along the edge of the 1x8 and marked where I wanted the BOTTOM of the moulding to stop.


I set my mitre saw to a 45 degree angle and cut my wood.

**Important to know***
Cut your wood like THIS...


NOT like this...


I made that mistake and couldn't figure out why it wasn't working. Laying the moulding flat will give you a great photo frame...but not a box which is basically what you're building.


I used wood glue along the backside of the moulding and used my nail gun to secure it to the shelf. The door moulding I bought (and probably they all have this) had an inset ridge that my 1x8 fit nicely into. See below how I did my moulding.

You could butt the moulding right to the top of the shelf, but I preferred to have a little lip on mine.


Your corners may not be perfect. That's what wood filler is for!
To get these corners you'll have to figure out which direction your wood needs to go and adjust your mitre saw accordingly. When I marked the wood I also made a pen mark diagonally in the direction I wanted the wood to go. That way when I cut my wood I could see the line and make sure my blade was going to cut in the direction I needed to match up with the other piece to make a corner. I definitely made more cuts than necessary all because I messed up the angles and measurements.


Once you have all the pieces cut and nailed together you'll be left with something like this.

Now the fun part... painting (UGH!)... I dislike painting the most. :)

Once it was painted and dried I chose to hang the corbels on the wall FIRST.


When both were hung on the wall and we had them leveled out we just screwed through the shelf into the corbel.


And VOILA!


Then came the truly hard part for me... Decorating them.


I'm really happy with how they turned out!! The total cost was about $47 for two shelves. Not bad when this look would have cost me $189 plus tax and shipping at Ballard.


Linked up here:
Somewhat Simple


Tuesday, August 16, 2011

You've got to be kidding me...

I finally got a few new pillows for our living room.

I'm loving the light gray/blue background and still some of my 'go to' colors of red and green.
I had my eye on them for a while at Hobby Lobby.
They'd been moved to the 60% off aisle which I LOVED. But I was SHOCKED to see the original price tag.

I thought to myself, "Who would spend $100 on a pillow!!??" Not this girl apparently.
Even 60% didn't help me out here.
So. I. Waited. and Waited.
Eventually they got down to $9.99 and I scooped up three of them.

They are nice, comfy, pretty pillows. Worth $100? Not in my book.

Maybe it's a scam for me to think I got such a GREAT deal. 90% off is pretty stellar. :)


Monday, August 15, 2011

Baseball Scoreboard {Wall Art}

When I saw this scoreboard in the Pottery Barn Kids catalog a few months back I tore it out (this was before I discovered Pinterest!) and knew I would do it "someday".

Well, that "someday" has come!


Last weekend while my husband was out of town, I got to work on this little project.
First things first... Wood!
I used some scrap plywood we'd been saving in the garage.
I measured the area the sign would hang and cut the plywood to size (4' x 3') using my jigsaw.

I chose to use the knotty side of the plywood to give it a little more character & spray painted it green.
When working with spray paint your colors are pretty limited so if I were doing it again I would have hand painted with a color closer to the PBK inspiration photo. I just like it better.

Once it was dry I used painters tape to mark my lines for the scoreboard. This is where the measure twice, tape once rule would have come in handy! After painting the middle line & ripping the tape off I realized that the two 'boxes' weren't the same size. My mom had come into town and we tried it again, this time successfully!

I created stencils for all the letters and numbers using my Silhouette machine. That little machine was AMAZING for this project.

Using a sponge brush I got to work. Tip: Use a rounded sponge brush for this. I just didn't have one on hand.

For the changeable score plaques I used paper templates to figure out how big they needed to be.

Then I used those templates to cut out the rectangles with my jigsaw & mitre saw. We then gave them a quick coat of spray paint.

Once they dried, I used my silhouette again to create the score stencils and painted them on. We drilled a small hole in the top of each piece of wood for the jute rope to slip through. Mom made a knot at one end with a loop to hang on the nail.

Last thing was to tape off the edge and paint a white border all around the scoreboard.

I nailed small nails in each of the Visitor/Home sections so that I could hang the score for each inning. Once I had them where I wanted them I tied a knot on the front of the plaque and trimmed the excess jute rope. I'm wondering how long it will take my 3 year old to figure out that these things can move (and be lost!). :)

He's pretty proud of the thing and I'm pretty happy with how it turned out. There are a few imperfections that bother me when I look at it, but overall the end result was exactly what I was going for. So, don't wait... Take those inspiration photos you've been Pinterest-ing and go for it!

UPDATED:I've had several questions about this project in the comments so I wanted to try and answer as best I could.

1. Do you take orders?
Yes! I would love to create a custom scoreboard.  The charge is $325. Remember it's a large piece... So the bulk of this is for shipping. (Shipping costs over $175 will be added on to the total).

 I will also sell the stencils if you want to create your own. The charge for that is $35 (includes postage).

2. What font did you use?
It's called Copperplate Gothic

3. What's the wall color?
It's Sherwin Williams Whole Wheat

4. What are your margins/letter sizes, etc?
See the photo below... :)

Let me know if I missed any of your questions...


Linked here:

Chic on a Shoestring Decorating
Fingerprints on the Fridge
The Shabby Nest

LinkWithin

Related Posts with Thumbnails