Showing posts with label Remodel. Show all posts

Wednesday, July 6, 2011

Kitchen Reveal

I'm finally ready to show you what has been the biggest transformation of the entire home renovation. Remember when I asked your opinion on cabinet colors? So...here's how it turned out.
THE KITCHEN!!


Shall we take a trip down memory lane to see how it began??


I still need to get rugs, wall "stuff" for the big blank wall in the breakfast nook, and window treatments. I'm also trying to figure out what to put behind the sink area. I used what I had...and it will do for now. I'm so used to warm colors and this kitchen is so different than my last one that I need to figure out a way to warm it up and make it more "cozy" if that makes any sense at all for a kitchen!!

So, what do you think? Was going 'blue' worth the risk?

For those interested:
Cabinet paint - Behr Paramount
Granite - Colonial Cream
Wall Color - Sherwin Williams Softer Tan
Lighting - Home Depot
Faucet - Delta

Wednesday, June 22, 2011

Inquiring minds ....

Remember when I asked your opinion on painting my kitchen cabinets? Well, I've had a few people ask me how they turned out. I have been dying to show you, but it's either been in construction, dusty (from all the remodeling), DIRTY (post remodel), or the counters have been loaded with boxes (AND a whole lot of junk!!). So, tonight I had to get things cleared off for a college guy's Bible study my hubby leads. That gave me a bit of space to work with to show you pictures!

I'm still not ready to show you the whole thing because there is absolutely no decorating going on at all yet. So... for now, here's my sneak peek of what it looks like. I am loving my decision!

Here you can see a little bit of the white subway tile backsplash... and my new stainless appliances.

It's been a CRAZY few weeks here (hence the no postings). We spent the week leading up to this past weekend getting the whole house ready including new tile, backsplash, A/C, carpet, cleaning, pool draining/cleaning/refilling, etc all for a move on Saturday. HUGE props to some great guys from our Sunday school class who helped us!!! Then we've had water curses galore... hot water valve issues, ice maker line issues, weird water sounds from our new A/C lines. Add that to my 3 anxious kiddos who don't understand why we can't go swimming RIIIIGHT now because mommy is trying to unpack the kitchen, bathroom, bedroom, etc. Whew, this was SO much easier when they were babies.

We have had fun though in the new backyard after my man did so much work getting the pool ready. So, it may take a little longer than I hoped...but someday this house will turn into a home. And hopefully I'll find some serious inspiration from all you fabulous ladies in the blogosphere!

Wednesday, June 8, 2011

I'm no fan of wallpaper

So, I mentioned in my last couple of posts that the fam and I will be moving to a new (to us) place that we bought as a foreclosure. Most of you are aware that buying foreclosures usually mean WORK is involved to make them better or liveable.

This one was no exception. For the most part it needed little to be 'liveable' but we like to create more work for ourselves and go ahead and do most of the updates before we actually move in. I've been spending most of my free time at the house peeling wallpaper so that we could have the walls textured and then painted. I'm convinced that if you've ever removed wallpaper you will NEVER put it back up... NEVER. But I know there are a few of you loony enough to do it. :)

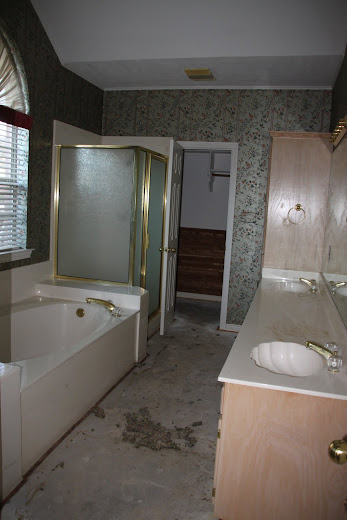
So... here's a sneak peak of the two bathrooms with wallpaper that needed to go!
MASTER BATH
(I'm going to regret only having 2 before pictures. Sigh)
straight out of the 90s with gold fixtures to boot

Finally a house with a toilet room!! I will LOVE being able to lock myself in to escape from my kids. Cause you know they only come to find me when I need a minute alone, right!

KIDS UPSTAIRS BATHROOM

This will be the perfect set up for our 3 kids (one boy and two girls). See how much space there is and we can won't have the issue of someone showering when another needs to potty! Oh how I am loving this already.... and they are only 5 and 3 now!


So, there you have it... wallpaper has been removed and the texture is complete. Now we've been working on priming and painting everything!


My tips for wallpaper removal....
1. Be PATIENT.... I keep saying I feel like I've got this part down in life...but God likes to remind me how wrong I am by putting me in positions where I have to learn all over again!
2. Soak the heck out of the walls. Score and WET WET WET it down. We bought a sprayer (that people use for fertilizer, bug spray, etc) and filled it with a solution of water and fabric softener.
3. Have a partner... it feels so much better to do such a mundane task with another human being. :)
4. Promise me that you'll never, never, never put wallpaper up again. Your future home buyer will thank you! Hee hee.

I'll be back soon with a sneak of how the kitchen cabinets turned out.... thanks for your input on my last post.

Wednesday, February 9, 2011

Master Bath Reveal

Remember when I showed you the destruction which was my master bathroom? Well I'm glad to say ... It's FINISHED!

This was the final piece of the interior renovation we needed to do to our 1960s ranch style home. Let's take a trip down memory lane...
THE BEFORE

Tile overload... shower, floor, wall, countertop. Whew... it was a lot.


DEMOLITION


We raised the height of the shower about a foot by taking the coffer down. Beadboard was installed to cover the area that had been tiled. Rather than having the wall re-sheetrocked and textured we opted for the beadboard... which I LOVE and would have everywhere if that wouldn't be an overload. :)

We chose to use an inexpensive unfinished wood sink base from Lowes which we painted to match all the new beadboard and trim.

We also used an inexpensive prefab counter top from Lowes (for $44). I used my jig-saw to cut the hole for the sink.


New hardware

New plumbing fixtures

Clean clean clean


New mirror & lighting
New shower door (that actually closes!)


Colors Used:
Olympic Smoky Slate
Olympic Cake Batter

Lindsay

Linked here:

Between Naps on the Porch

Tuesday, January 25, 2011

Hall Bath Remodel

I can't believe this hasn't been blogged about yet!! It was one of the most anticipated remodels that we had when we moved into our house almost 2 years ago. The HALL BATH!!

Remember this house was built in the 60s and most recently was occupied by 5 college renters! It needed some major help that's for sure. Don't believe me? Check out the kitchen and exterior remodels we did.

THE BEFORE PICTURES

Notice that the tub was never intended to be a shower! The previous owners had rigged a shower head to do the job and the tile splash didn't even reach the head.


Lovely square tiles with old, dark grout. The one thing it did have going for it was that it was installed on the diagonal!


The toilet area had tile up the wall. For what purpose? I don't know! It was in better shape than the floor though. At least the grout was still white!

THE AFTER PHOTOS

We purchased a new toilet, installed beadboard all the way around the room (equal to where the tile had been on the wall).


Ahh... a real shower head & tile surround. We kept the same tub to save money and it was still in fair shape.


Fresh tile, fresh paint, new beadboard, fixtures and it feels so clean!

The lighting isn't fantastic so I apologize! But hopefully you can get a good idea of where we came from and where we took it!

We also renovated the vanity top & lighting...but I can't find the pictures of that project. So, when I do find them I'll show that off too!


Now... I can't wait to see similar results from our latest project... the master bath!!!


Linked Here:
Sugar Bee

Monday, January 24, 2011

Easy Valentine Decor

I'm sure you've all seen (and have probably already made) the cute rag wreaths that are all over blogland. I saw some cute Valentine ribbon at Hobby Lobby on sale for 1/2 off so I figured I'd give it a shot.

The first thing I did was form a circle using floral wire. I made mine pretty small since I wasn't really sure where this thing was going to end up.

I used skinny ribbon (a lot of other wreaths use fabric strips). It's what I had so I went with it! I tied a ribbon to the circle form and trimmed to the length I desired. Then I used that as my template to cut all ribbon.

Then it begins.... just start tying the ribbons on your circle form.


Once it is finished all that's left to do is find a home for your new decor.

This is a really really inexpensive craft...especially if you happen to have all the supplies. If not...just wait for those inevitable sales!

LinkWithin

Related Posts with Thumbnails