Wednesday, June 29, 2011
Chalkboard Craze
I turned a piece of artwork destined for the garage sale pile and created a new piece that will float around my house until it finds it's resting place.
I've had this artwork for 8 years... I still remember buying it with a crazy coupon the day after Thanksgiving our first year of marriage -- at the crack of dawn. It matched perfectly with our then master bedroom decor and in our many moves I've found a place for it to land each time. But, like my last post told you... I'm ready to weed out what I don't LOVE and take the time to slowly gather what I do.
The detail on the frame is awesome! I had a feeling it would look great in a different color.
Here she is all finished up. Fresh coat of red spray paint and a chalkboard center.
See the detail... I love it!
I'm not sure if it will end up staying here in our entry but I love the thought of being able to have verses, quotes and announcements to greet our guests. It's also visible from the stairs and living room so it will get quite a bit of notice. All I have to do now is work on my handwriting!!
I used chalkboard spray paint and the jury is still out on whether I love it or not. It's a bit rough and erasing seems to be a bit of an issue. Towels leave their residue (due to the roughness) and I'm afraid to use water. Any of you out there have spray paint chalkboards? How do you erase and clean the thing?
Linked Here:
Someday Crafts
Tuesday, June 28, 2011
Taking it Nice and Slow
Unfortunately, yes it does!
I am NOT patient when it comes to this sort of stuff (or much else for that matter). I see the blogs and Pinterest images and get inspired and want to do it NOW. I don't deal well with incomplete spaces. And I think I have decided why.
I care too much about what other people think. Sadly, it's true. Doesn't everyone want their house to show like a magazine (or be featured in a magazine?!). I have a habitual need to explain to my guests that "this won't stay like this" or "I'm planning on doing this" or "Eventually..."
Maybe this is a fine little test from God to allow me to learn to be content in the "in-between" stage - between the boxes and the final product. But for now I'll give you a tour of my FAR FROM FINISHED & very naked living room (and welcome any and all suggestions you may have for my "eventually" list). I have added more decor to some areas here & there but let's be honest... I'm too lazy to take and upload more pictures...and that gives me something else to blog about later.
This photo is taken from behind the couch in the corner of the room.
This is my number one priority area...
1. keep or sell the sectional
2. if keep then I plan to put a sofa table behind the right side with lamps and decor to fill some of the space. then I'll have the whole left side to tackle with some large non-artwork
3. PILLOWS!!! Must first decide on color scheme keeping in mind what my kitchen cabinets are
I want to paint the secretary some color... again WHAT?! :)
Another view
Friday, June 24, 2011
Pajama Party!!!
I set up the table to (hopefully) look like a bed.
I made cupcake toppers to go on the cupcakes. I hesitated doing them since the pancakes are pretty sweet by themselves and what parent really wants to load their kid up with sugar all before lunchtime!? Well, shoot me... :)
Juices and milk
Inside the party favor bag I put a plastic cereal bowl, a small box of cereal, a juice box, and a granola bar. I used my Silhouette machine to do the tags.
A friend of mine made these cute PJ tops. She has a online boutique you should check out... The Purple Pecan.
The invites told the kids to wear their PJs to the party -- here's big sister.
TOPPINGS!
Our oldest turns FIVE (how did that happen?!) this July so hopefully I can come up with a fun theme and master my camera by then! :)
Linked Here:
Fingerprints on the Fridge
Thursday, June 23, 2011
Kitchen Table Redo & Linky Party
My husband and I are DIYers. We love to save money doing things ourselves (when our skill set allows). In our new home I was going to need a new kitchen table since our current set up was too big. I began looking all over the place in stores for the "right" thing at the RIGHT price! I was coming up empty. Finally I knew what I needed to do... find one on Craigslist. After much looking I found THIS!
Oh I know what you're thinking... ummm... it's in pretty bad shape. But I just knew we could make something of it! The college guy who was selling it reduced his price to $35 and I jumped on it! My plan was to paint the bottom and restain the top and find some great chairs somewhere that would coordinate.
Here's how it turned out!!
Oh I love it!! I ordered the chairs online after another LONG search for the "right" ones. I have to give major props to my husband because other than me using the sander a few times he did ALL of this redo himself. He's such a good man! He did three passes with the sander using 60 grit, 110 grit & 220 grit paper. I picked out a stain that would as closely match the chair seats as possible (I still should have gone darker).
By the way...these are HIS man hands. Haha.
I think he did 3 coats of stain. (again...should have picked the darker stain).
All that was left was to paint the side apron and the pedestal base. I had the paint color matched to the chairs so that it all coordinated.
Ignore my blank wall... just moved in Saturday. LOADS of decorating to do!
Are there any other DIYers who have turned worn out furniture into your treasure? I'd love to see it! I need some inspiration for a secretary hutch that needs a facelift. Link up!!
Linked Here:
Chic on a Shoestring Budget
Miss Mustard Seed
Fingerprints on the Fridge
Finding Fabulous
The Shabby Nest
Wednesday, June 22, 2011
Inquiring minds ....
I'm still not ready to show you the whole thing because there is absolutely no decorating going on at all yet. So... for now, here's my sneak peek of what it looks like. I am loving my decision!
Here you can see a little bit of the white subway tile backsplash... and my new stainless appliances.
It's been a CRAZY few weeks here (hence the no postings). We spent the week leading up to this past weekend getting the whole house ready including new tile, backsplash, A/C, carpet, cleaning, pool draining/cleaning/refilling, etc all for a move on Saturday. HUGE props to some great guys from our Sunday school class who helped us!!! Then we've had water curses galore... hot water valve issues, ice maker line issues, weird water sounds from our new A/C lines. Add that to my 3 anxious kiddos who don't understand why we can't go swimming RIIIIGHT now because mommy is trying to unpack the kitchen, bathroom, bedroom, etc. Whew, this was SO much easier when they were babies.
We have had fun though in the new backyard after my man did so much work getting the pool ready. So, it may take a little longer than I hoped...but someday this house will turn into a home. And hopefully I'll find some serious inspiration from all you fabulous ladies in the blogosphere!
Thursday, June 9, 2011
Bloglovin
If you're like me you follow a ton of inspiring blogs or have a zillion on your blog readers. Since really getting into the blog world about a year ago I found myself overwhelmed at how to keep up with them all without missing one amazing thing. I tried adding them all to my internet favorites and would go up and down the list seeing if anyone had a new posting. Then I started 'following' them through my google account. Then I ventured into the Google reader. None of those come close to the greatness that is
Seriously I LOVE this site.
I have no connection whatsoever to this site so this is a completely random plug for a really great way to keep up with all your favorite bloggers.
Here's how it all works. Go to their site and create an account. Then the fun part begins... start adding every one of those blogs you just can't get enough of. Once you have your list the bloglovin' site tells you when there's something new to be seen.
Once you've checked out all the updates ... or the ones you cared to click on. You can choose "mark all as read" and it clears out your queue so that when you log in next time it's only going to show you what you've not yet seen!! Another feature I love is that you can sort by blog. So if I don't have time to sort through all 66 (or 214 like after last week after my vacation!) you can choose one at a time to catch up on and mark those as read to clear them from your list.
Something else you can do is "like" a post. How great is that? So if I see a super cute birthday party or cloche idea that I don't to forget all I have to do is "like" it and bloglovin' will keep track of it for me! That would have been helpful last year when I came across a blog that had some super cute Valentine decor in her kitchen. In the world of blogging if you come across something you like you MUST MUST MUST follow it. If not, you may be like me and never come across it again. So, if you are the gal who uses a cloche dome at Valentines in your kitchen with an ornament hanger and a cute ornament... I used you as inspiration and I wish I could find you again! :)
By the way... if you don't see your name on my list that either means you didn't have anything new or your blog name is alphabetically after "K"... OR it means I don't know about it yet. So, go ahead and comment and leave your link so I can find you and add you to my bloglovin' list!
Have fun setting up your bloglovin' account!!! You'll be so happy you did.
Wednesday, June 8, 2011
I'm no fan of wallpaper
This one was no exception. For the most part it needed little to be 'liveable' but we like to create more work for ourselves and go ahead and do most of the updates before we actually move in. I've been spending most of my free time at the house peeling wallpaper so that we could have the walls textured and then painted. I'm convinced that if you've ever removed wallpaper you will NEVER put it back up... NEVER. But I know there are a few of you loony enough to do it. :)
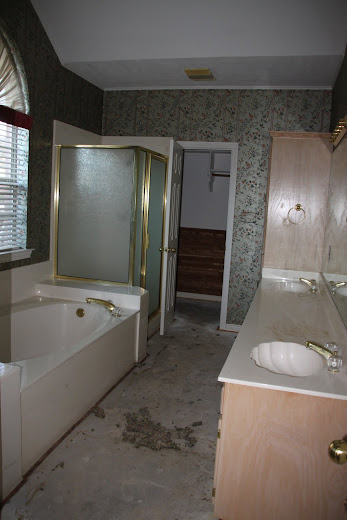
So... here's a sneak peak of the two bathrooms with wallpaper that needed to go!
MASTER BATH
(I'm going to regret only having 2 before pictures. Sigh)
straight out of the 90s with gold fixtures to boot
Finally a house with a toilet room!! I will LOVE being able to lock myself in to escape from my kids. Cause you know they only come to find me when I need a minute alone, right!
KIDS UPSTAIRS BATHROOM
This will be the perfect set up for our 3 kids (one boy and two girls). See how much space there is and we can won't have the issue of someone showering when another needs to potty! Oh how I am loving this already.... and they are only 5 and 3 now!
So, there you have it... wallpaper has been removed and the texture is complete. Now we've been working on priming and painting everything!
My tips for wallpaper removal....
1. Be PATIENT.... I keep saying I feel like I've got this part down in life...but God likes to remind me how wrong I am by putting me in positions where I have to learn all over again!
2. Soak the heck out of the walls. Score and WET WET WET it down. We bought a sprayer (that people use for fertilizer, bug spray, etc) and filled it with a solution of water and fabric softener.
3. Have a partner... it feels so much better to do such a mundane task with another human being. :)
4. Promise me that you'll never, never, never put wallpaper up again. Your future home buyer will thank you! Hee hee.
I'll be back soon with a sneak of how the kitchen cabinets turned out.... thanks for your input on my last post.