Showing posts with label Simple Decorating. Show all posts

Tuesday, January 22, 2013

My Painted Secretary

It is finished! 
Last week I wrote about how a visit to my blog reader prompted an inspiration for me to finally paint my Craigslist Secretary desk.

We had a very rainy week here in Central Texas and my husband was out of town for most of it. So, that gave me plenty of time while the kids were occupied to get to work painting.

Remember how it started?
The day my hubby left for a 4 day retreat/conference/wedding {three separate things...not a wedding at a retreat! ;) } I asked him to get everything all ready for me to paint.  I wanted to do it inside so I'd be near the kids and keeping tabs on them so he moved it into the entry way for me and disassembled everything.  Good man, Good man.

I had to prime it before painting and our primer is oil-based.  I can't stand oil-based paint.  Not because it stinks - but because I am MESSY with painting and messy with Oil-based means a lovely bath in Paint Thinner when I am ready to clean up.  So, it's not LITERALLY a bath...but really, I can get paint EVERYWHERE on my body.  It's ridiculous.  In an effort to protect my skin I covered up EVERYwhere.  Don't believe me...
And yes, that is a basketball hoop on our front door.  Somehow my boys {old and young} decided to move it here and it gets more use here than it ever did in our son's room so... it stays {for now}. Last night it provided entertainment for our college kids after dinner - competition can be found in anything!

After priming everything I let it sit overnight.

We removed the inner workings of the desk for two reasons. One: I didn't want to hand paint all those nooks, crannies & crevices. Two: I wanted it to be another color.  More on that later...

The front of the drop down desk had a ugly lovely to someone wharf scene. I'm sure someone paid a lot extra to have that etched into the wood.  But this girl wasn't a fan.  So, we used wood filler for the deep etchings and then sanded it somewhat smooth.
I was amazed that after just the primer coat how you really couldn't see the etching anymore. And after two coats of color you would never know it existed.

I bought a chair from TJMaxx that had a bit of sass with the zebra print, but still blends so well with my color scheme that's working in this room right now.  I loved the detail on the legs.
 
I love looking online to see if I can find where the chair originally came from.  I never found an exact match but I did find very similar chairs at some of the big name home decor places.

We also took the glass out of the doors to paint.  I wanted to remove the "panes" look that was on the front of the doors and to do that we needed to pop the glass out and then the wooden panes just pried right out of the inside of the doors. {It wasn't attached directly to the glass}


We ended up getting a new piece of glass cut & mounted inside the door after we cracked one side trying to secure it.  It only cost us about $15 and it's more professionally secure than what we were trying to do! :)


 I went to Lowe's and picked up new drawer hardware.  I settled on these because they were literally the only in-stock pulls that were the same size as the old ones.  Thankfully, I also liked the look of them.

I'm so happy with how it turned out! It's come a long way since my dad brought it to me from Houston after I spotted it on Craigslist.  I think I paid around $125 for it.  


And here it is today!

Where I happily have a new home to blog from!

And for the details:
Paint color is the same as our kids bathrom redo: Valspar Mountain Smoke
The interior part of the desk is spray painted with Rustoleum Painter's Touch Ultra Cover in Ivory {Gloss}
Drawer hardware is from Lowe's
Original hardware was spray painted with Rustoleum Hammered in Dark Bronze

Linked Here:
Fine Craft Guild
Someday Crafts
Southern Lovely

Tuesday, November 29, 2011

Paint Stick Ornaments

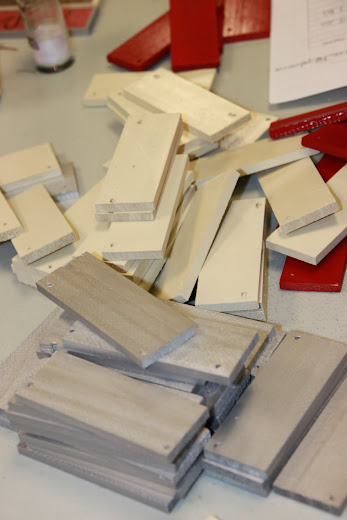
I told y'all yesterday when I shared with you the cute snowman gift tag that I'd be showing you some of the crafts that our Bible study did for our "Super Saturday". Today's adorable idea was found through Today's Fabulous Finds. Who'd have thought that making ornaments out of free paint sticks could turn out so cute?

You can find the tutorial here. Or if you're really good at figuring things out from pictures read on... haha.


Have your paint sticks ready in various colors (ours were red, cream and grayish silver).


Gather your supplies. The template for the words can be found here.


Put it all together and here's what you'll get. Super cute and super inexpensive ornaments for your tree or for gifts!


Friday, October 14, 2011

I'm BAAACK!!

Well, thanks to Tiffany this blog hasn't been completely neglected! My family has had a whirlwind of a few weeks so while I've had good intentions for blogging but it's just not made the cut.

I've had this wall staring at me since we moved in to our house in June. It's a bathroom... so I feel like I'm pretty limited on what can go up on the walls here. It's also above the tub which gets used rarely and I didn't want the typical towel bar to fill the space. {I don't have a photo of it completely blank. :( That would have been good of me... but do me a favor and imagine it without the basket!}


So, when I came across this photo on Pinterest I knew what I was going to do! {Now you can see where I got the idea for the basket in the previous photo}

So, I took this blank wall.


Built another cafe shelf {see the tutorial here}. I painted it the same color as my cabinets and then got my brain working on what would go up top...


I added a metal and wood piece I picked up from Round Top/Warrenton. Then I searched the frames I had sitting in my guest room for some to create an arrangement on top of the shelf. {Ignore the change in lighting... I have put off taking photos for 3 weeks now so it was 8:30 pm or never!!}


I took some of our family pictures and edited them to be in a sepia tone and had them printed at Walmart to fill the frames.

All this stuff was bought at Hobby Lobby at half off. I used the inspiration photo as a starting point for what I wanted it to look like.


I would still like to eventually replace the blinds to the rattan shades to bring a little warmth to the room but for now I'll live with the white blinds. I will have to figure out way to convince my hubby that replacing perfectly good, functioning blinds is worth it. Ha!


So, there it is... pretty much the ONLY thing I have had time to work on in several weeks. But, I'm happy with how it turned out and glad to have yet another wall checked off the "to do" list.

Stress-free decorating!

How many times have you hung things on the wall, stepped back to admire your handy work, and noticed it's crooked, off-center, or not spaced correctly? Or, how about those annoying frames that have two sawtooth hangers, or the kind that the screw has to fit into the hole "just so" and to make it even worse there are usually more than one of them? Oh, how I dislike those!!

Well, I'm here to share with you an easy way to make hanging things so much easier and less frustrating!

My first tip is to use masking tape {or painters tape} on the wall to lay out where you want your piece to be hung so you can imagine it there. I did this with my kitchen shelves so I could "live with it" for a day or so, just to be sure.

Next, take your tape and lay it over the top of whatever your mounting method will be. In this case it's the pesky screw holes that have to be exactly right or else you'll NEVER get the thing hung.

Use a pen or pencil to mark the holes. {In the case of other types of hangers you'd do the same concept...just marking where your nail or screw needs to end up}.


Take that piece of tape off and place it on the wall where it needs to go. This is why I love using the tape to lay out the outline of whatever I'm hanging. You can use that tape to measure out where exactly your nail/screw holes should be and there shouldn't be a need for a 're-do' because the height or centering wasn't right.


Nail or screw your holes, remove the tape and hang your piece!

I promise you this has revolutinized how I hang ANYTHING in my house. I wish I'd done this for years. I would have saved myself so many holes. Not to mention the crooked, off centered, & uneven decorations I've lived with just to save myself from doing it all over again.


I hope it helps you too!

Friday, October 7, 2011

Picture frames

I love open picture frames!

I picked these beauties up at Round Top last week and am SO excited about using them. I'm not even sure how I'm going to use them, but they will, through some shape or form, find their way onto my walls. For $10, how could they not?!

Thursday, October 6, 2011

Transitional Urns

Please ignore the massive amount of spacing on this post. My computer has a mind of it's own right now!


My urns stay hard at work year round!
Today, they look like this...


Which I'm very excited about since that means that Fall is around the corner!
Yesterday, they looked like this...

And in a couple of months, they will look like this!..


They can do no wrong :)

Thursday, September 29, 2011

My VERY Simple Fall Decor

It's officially FALL!!! YAY, I am so excited.
But, we live in Texas so there really isn't a 'Fall' season here like in other places. Check out the weather forecast for tomorrow!

Although I am sad about the temperature, I couldn't be more happy about the potential for RAIN! We need it oh so bad. It rained here for a little while this afternoon and my kids had a great time using their umbrellas.

If you haven't heard, Texas has had a terrible drought this year. So, we've only seen rain a handful of times {ALL YEAR LONG}. There have been countless wildfires all over our state. This one broke out just across the highway from our house. Thankfully it was contained quickly and no structures were damaged.

So, I finally pulled out my fall decor last weekend (or I should say my hubby did!). As I pulled it all out I realized how much I disliked what little I had.
I've started working part-time at my kids school so my "free" time is limited. The house won't be decorated like I wish it was... but for this season, here's what I've got.

For the life of me I can't take a good photo of my mantle. The lighting is never right! And every time I look at it on 'film' I realize how blah it really is.

I will add candy corn to this apothocary jar {eventually when I make it to the grocery store}.


I made this Fall frame by cutting out the word FALL using my Silhouette machine, using it as a stencil and spray painting it. That's the lazy way {hence the fuzzy edges}. I'd recommend hand stenciling it with a sponge brush.


This wreath is hung on the mirror using a burlap sash.

I added a few fall colored berry stems to this urn that was already here. More berries are on my Hobby Lobby to do list.


Well, there you have it. It's simple. It's boring. It's lacking the awe factor. But considering it was 100* today it's as "fallish" as I'm able to feel today.

LinkWithin

Related Posts with Thumbnails