Showing posts with label Garage Sale. Show all posts

Tuesday, July 12, 2011

Because I love my man...

Tiffany & I have been busy the last few days and over the weekend as we were getting ready for our first ever joint "Village House" garage sale. Since my family recently moved I'd set aside a bunch of things that I didn't need anymore. We had another friend who brought some stuff over too and the three of us (plus my mom) worked the sale this past Saturday. See the sampling of some of what we sold...

I had great visions of what my profits would buy me...
1. Headboard and bedding for guest room
2. Great long sofa table for behind our couch
3. Window treatments for any of our bare windows
4. Kitchen rug
5. Entry rug
Ok, so obviously the money wasn't going to buy EVERYTHING on my list...but a girl can dream, can't she?

Saturday after the sale I came home to find my man cleaning out our garage that had been filled with boxes after our move and a bunch of things that needed to go out to the curb. He's been talking about getting some shelves for the garage to help with some much needed organization. We just talked about it the other night and decided we should wait a few months since we've been spending money like crazy (as you do after a move to an old foreclosure!). As I was talking to my mom that afternoon it hit me... "my" money earned from the garage sale wasn't really mine. It was his -- he deserved it for all he does to support me and my crazy ideas, wants, desires and hopes for our family. So, although the garage sale was 100% my idea & my work... I was happy to buy these nice shelves for him....

Let's be real honest... his hard earned money goes towards purchasing a whole lot for me, (the house) & the kids and rarely does he get something for himself.

So, all you married ladies with a hubby who supports you 100% give him a HUGE thank you today. Thank God for that. You, my friend, are blessed.

Friday, October 29, 2010

Look What I Got!!!

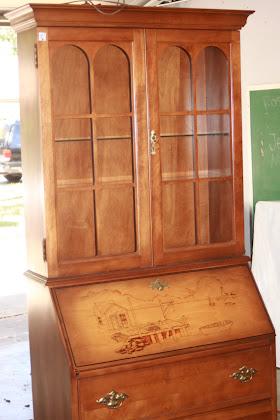
So I have this wall in my living room that I've absolutely hated since we moved in. I just haven't known what to do with it. I've tried a few things here and there and it just wasn't working for me. Then I decided after seeing some beautiful secretaries out there in bloggy land that it was just what the wall needed. I searched at Round Top. I searched at Canton. I found a lot I loved... but the price tags made me gasp. I was not willing (or able) to spend $400-$500 on one of these babies. Enter CRAIGSLIST! I found this....

Now, I don't like the wharf design on it so that will get covered up (or opened so you can't see it). But I got this for $125 (and it has a lighted hutch). I couldn't believe that it was still available when I called the lady. I am pretty excited... but now I don't know what to do with it and here is where I need YOUR help!!! Do I paint it, do I stain it, do I leave it as is (and fold down the drop desk to hide the wharf?)?


Will you help me, pretty please?? I've got both black and stained furniture in the living room right now. My walls are cream colored. My gut is to go bold and do red with this piece. The sofa is leather, I have a greenish goldish chair that will be close by. If I was on the ball I'd show you pictures of my room... but that requires some advance planning and I just don't have motivation right now! :)

Friday, September 10, 2010

Chalkboard Calendar

I'm so excited to share this post with you today!
It comes from my sweet friend Lisa...

I recently saw this dusty, ugly framed mirror on a routine trip to Goodwill, I instantly remembered Tiffany's chalkboard and knew the ugly thing had the potential to become the perfect weekly calendar for our kitchen. So I haggled on the price and got it down to $25. Not exactly cheap, but I thought it was worth it for the vision I had in my head.

I didn't think to take a photo of it before I sanded it and popped out the scratched mirror. You'll have to just use your imagination...

Then I took a trip to Lowe's and picked up a quart of chalkboard paint and some backer board. Since I had measured the frame before I left, I asked the nice old man that rubbed my son's head ;) to cut the backer board to fit the frame exactly.

I painted the smooth side of the backer board with the chalkboard paint using a sponge brush. It would have been nice to have a wider sponge brush, but I just used what I had on hand and a normal paint brush left brush strokes. I also used some glossy white interior paint that we had on hand to paint the frame.

Second coat:


Third Coat:

And....Ta Da! I think it fills the tall, awkward corner wall in our kitchen quite nicely.

I liked the weekly calender on Tiffany's board so much that I copied it. Straight up copied. It's the best form of flattery, right?

The color is off on this photo. I don't have yellow walls...but you get the idea. :)

I love it! It replaced our weekly dry erase board in the laundry room where I wrote dinners and commitments down and the grocery list that was on the fridge. My husband even uses it for his own lists and the ledges make the perfect "tray" for chalk. Now I'm just working on training my son not to grab for (and try to eat) the chalk. ;)

Thanks for sharing Lisa!!

Check out Lisa's Bible covers, personalized magnets, & more.

So, so cute!!

Tuesday, August 31, 2010

Making Money

Want some of this?

Have one of these!!!

This past weekend my hubby and I had a garage sale (with the help of my mom!). I had been collecting stuff in our garage that we just didn't need anymore... kids clothes, toys, shoes, house decorations...you name it & it was there! I planned on taking pictures of all my loot...but if you have done a garage sale you know how EARLY you rise and my brain just didn't think in regards to the blog...and I had a feeling my mom & husband would have thought I was craaazy. :)

Here are my tips for a succesful garage sale...
1. Advertise in your local paper.
2. Place an ad on Craiglist & place signs around your neighborhood.
3. Sort your items into like categories and label if possible. For example: I went through all the kids clothes and sorted by size...then placed into tubs with labels showing 18-24 mo (GIRLS).
4. Do bulk pricing for clothes. Instead of having a set price for clothes (which you know someone will balk at anyway) tell your customers to bring you a stack and then you'll tell them a price for it all.
5. Be PREPARED for mayhem! Inevitably you'll get a couple of ladies who will bring you a TON of stuff (in my case TWO tubs full of clothes) and want a price for it all.
6. Be WATCHFUL -- in the case of the above scenario watch for people who will add to their pile after you've quoted them a price.
7. Get out EARLY!! Be prepared for people to be stopping by 30 minutes before you're really opening up for sale.
8. Whatever doesn't sell have Goodwill, Salvation Army, Habitat, Sand Dollar, etc. come pick up or drop it off yourself. Don't be tempted to keep it for the 'next' garage sale!

Get after it!! Make some $$$$.

Anyone have any other great tips for hosting a garage sale? Please share...I have a feeling this may be a yearly thing for us.

Monday, August 30, 2010

Living room rearrange

This is my living room. Sad, I know. It's been in this sad state since we moved into our new house, mostly because I can't figure out what to do with it. It's a large room that's lacking personality. We spend 90% of our time in here & it's my least favorite room in the house!
It needs help! Can you help me??
These are the things I DO NOT like about it...
1. Seeing the back of the couch from the kitchen. It's just NOT inviting.
2. Feeling overrun with toys.
3. No curtains, no rug, no texture of any kind.
4. Blank walls. Need I say more??
here are a few more shots...
Sad. Right?? Well, I had had enough of it this weekend. I was determined to do something about it & to do it, without spending any money.
So here we go...
First things first. I moved the couch. It only needed to scoot about 3 feet, but it made a BIG difference. I angled it away from the corner so that it wouldn't be against the wall. I'm not sure why, but I'm just not a fan of couches on walls. I also borrowed these curtains from my guest room. I'll come back to those...
I then stashed the toy baskets behind the couch. They're now out of the way but still accessible to my girls.
I moved the big bulky chairs that were in front of the windows (actually covering the windows) to the opposite side of the room. So while I still have nothing on this wall, I at least now have something over there.
I then positioned these 2 smaller chairs in front of the windows. This red one was in our bedroom, but I think it fits better in here.
Lastly I brought in this old rug from the garage & set it in front of the couch. It's a little bare & a little raggedy, but it will do for now. I moved the kids' table to the end of the couch as a makeshift end table. The kids & hubby seem to like it's new home, so it may hang out there for a while.
And here's the result! What do you think??
Overall, I'm pretty happy with it. It's definitely better than it was last week!
I'm still uncertain about the curtains, the rug & of course the walls!

And that's where I need your help!!

First, the curtains... I love them close up, (with the flowers on top & leopard on the bottom) but from the kitchen you can't see any of the leopard print & I feel like they look very...70s-ish. Am I crazy?? Be honest ladies. No hard feelings!!

Next, the rug. It's got to go, I know, but what do I replace it with? I'm leaning towards something neutral, but I need suggestions!

Lastly, the walls!! Where do I even begin? The one on the left is so big & overbearing, that I feel like it needs to be anchored with something or a couple of somethings..well..that are big..
What are your thoughts??

Seriously. I can't wait to hear some of your fabulous ideas!!

thanks!
Sumo's Sweet Stuff
Making
The DIY Show Off

Monday, August 9, 2010

"Shutterly" Fabulous

**Forgive the crazy layout of this post... Blogger is not cooperating with where I tell the text to go!!**
This past spring Tiffany & I took a trip to an area antique/flea market. I had a list of a few things I was on the lookout for and hadn't really found the right thing for the right price. That was until I spotted these beauties...


Okay so there's only one and it isn't beautiful!! I actually bought a pair of these shutters for $10 cobwebs & dobber nests included.

You see I had this long blank wall in my dining room that desperately needed filling.

I used my handsome helper to help me measure, level and hang them after spraying them with a quick coat of black spray paint.

And we used a very technical method of keeping even spacing.

Complete! Okay so I see the glare on the sides of the shutters where I should touch up the spray paint....but what is it The Nester says? It doesn't have to be perfect to be beautiful, right?

So I plan to change this up seasonally and it currently looks like this...


So next time you see a pair of rusty, dirty, dusty shutters think about some way you can use them! Remember Tiffany showed us a cute idea to use a pair of shutters here.


Keeping It Simple


Making


Making


6 Inches of Ribbon

LinkWithin

Related Posts with Thumbnails