Monday, January 30, 2012

No-sew fleece blankets

Have you seen these blankets before? They're fantastic!!

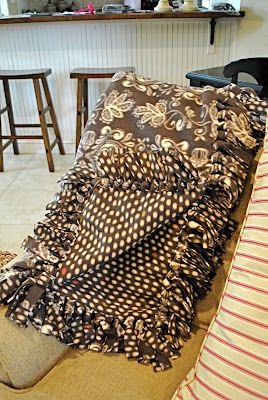
I wish I could take credit for them, but they're actually the project of my
9 year old niece, Kaylee. She's so crafty. I see big things in her future!~

And they're very easy to make. No sewing required!

Kaylee gave me step-by-step instructions on how to make them...

1. Buy 2 yards of 2 colors of coordinating fleece.
Spread them out on each other with the right sides facing out.

2. Trim off selvage edge of both pieces so that they're the exact same size.
Then cut a 6" square out of each corner.

3. Start making 6" cuts every inch, all the way around on all 4 sides.
It helps to lay a ruler 6 inches from the edge and just cut to the ruler.

4. Begin tying all strips.

Keeping both fabrics together, loop the tab to the right & then over itself.

Come back through the hole & pull straight down.

They would make great house warming gifts or baby blankets.
(For kids' blankets, Kaylee used 1.5 yards instead of 2.

So cute & cozy!
Thanks Kaylee for our wonderful blankets
and for teaching us how to make them!

Thursday, January 26, 2012

Dining Room Reveal {still in progress}

I shared with you a week or so ago about how I had big plans for the dining room. Well, I'm here to show you how it turned out {So Far}!


Sorry for the quality. I don't know what I'm doing with my camera! :( And it was taken the night we finished up.

Remember the before?


It wasn't terrible... but just didn't have any character. So, we spent several days/nights working on this room and came up with this result.


I am really excited about how it turned out and can't wait to get the rest of it finished. We still have a ways to go.... new blinds {seriously, how can someone's dog ruin EVER blind in one house? the previous owner must have had quite the dog!}, new curtains, and a new buffet/hutch/something because I sold the piano on Craigslist. You know how much I love craigslist because I talked about it here and here.


Come back Monday to see the Tutorial for my version of Board and Batten.

Wednesday, January 25, 2012

Kids Puzzle Storage Solution

If you have small children, chances are you have a few of these laying around the house.

Well, we had a ton of them and they were starting to outgrow their storage spot. {No before pic...I didn't think this was blog-worthy until after I cut all but two boxes apart!} I decided it was time to fix that and thanks to an idea I saw my sister-in-law using I have condensed their space from one basket to two!

All it takes is a pair of scissors and sandwich bags.

Cut the front of the box off so that the puzzle image is all that's left (it's a good idea to also cut around the number so you'll know how many puzzle pieces you should have for each puzzle). Place that inside a sandwich bag along with all the pieces and Voila!! That's it.


Now all the puzzles are stored nicely in individual bags, with their picture and without the bulky space-consuming boxes.


I went from two of these baskets OVERFLOWING with boxes to one basket with room to spare.


I'm happy to be rid of these things.... and glad to have a free basket to be cluttered up with more of my kiddos things! :)


Monday, January 23, 2012

Saving your Silhouette SD designs to PDF

I'm going to show you something that will change your life! Okay, well it's not THAT big of a deal...but I am pretty excited about it.


I have a Silhouette SD and I've never really used it as much as I think I could. My main issue had been the print and cuts. I love the idea and I love being able to design things and have the machine cut it out EXACTLY as it is on the screen. My problem has been my printer though. It's not a terrible printer, but the quality isn't what I want it to be if I'm designing cupcake toppers, banners, gift tags, etc. Our local copy center does a good job for a relatively great price. But I couldn't figure out how to save my files in a format that could be emailed or opened by their computers. {Silhouette automatically saves things as .studio files}

Thankfully, after literally MONTHS of looking I found a tutorial that showed me how I could save to PDF formats. Hallelujah!! Seriously this just opened the floodgate of what I will create on the Silhouette!


Here's how you do it.


First off... create your design. Make sure you Show Registration Marks


Then go to File. Print.


This should bring up a new window where you can select to print to Adobe PDF
If you don't see that option then you need to load Adobe on your computer.

Once you select "Print" it will bring a new window up where you can name and actually save your file.

And there you have it! A file ready and able to send to a copy center so you can have a great print quality on your Silhouette files if your personal printer isn't doing a great job!


Keep in mind to SAVE your file also as a Silhouette Studio file so that once your ready to cut using the machine you can open it up again and it will know what it's supposed to be cutting. :)


I hope this helps you. If you need the video tutorial that I discovered you can find it here.


Saturday, January 21, 2012

Christmas Card Books

So I realize it's the end of January and everyone is on to Valentine's things (including me!). But honestly, I haven't had a chance to even put up all of my Christmas stuff! Please tell me that I'm not alone??

So if you'll bear with me, I've found a new plan for my Christmas cards this year that I'm really excited about. Christmas Card Books!
Christmas cards are something I just hate parting with. And now I don't have to! This is such a clever way to display your cards, year after year.
I'm thinking the coffee table will be the perfect place for them to all land.
And since so many cards these days have pictures on the back, this is a great way to be able to flip through them with ease.
To download this cover, click here.
Then you'll be able to write in the year, or use stickers. Whatever you'd like.
Print it out on card stock and use a hole puncher on all of your cards. If you have a 3 hole punch (although you only need 2 holes), THIS is the time to use it! Holy moly, my hand hurts. But totally worth it!

Thank you eighteen25 for sharing such a GREAT idea! Check out some of the other ways they've decorated their books. So cute and clever!

Thursday, January 19, 2012

Valentine's decor

I had a few minutes this morning to bring out the rest of my Valentine's decorations. Since I have so little Valentine decor, it really did just take me a few minutes! But here it is, none the less. Full of pink, red & LOVEly things...
These apothecary jars are great for every season. For Halloween, they looked like this. And for Christmas I used J-O-Y with red bows (sorry no picture).
And here is the window frame I finished this weekend. To see how I made it, click here. A big thanks to House of Smiths for the inspiration!

Wednesday, January 18, 2012

Silhouette Cameo!

I just ordered a Silhouette machine!

I can't begin to tell you how excited I am to get it and start using it!!
Truth be told, I've been using a Silhouette machine (Lindsay's Silhouette machine) for months now. She's been so sweet to let me borrow it and then borrow it again for countless little projects that I've needed it for.

So I'm now on the look out for more Silhouette projects!
How Does She has a ton of ides! 44 to be exact. Everything from clothes and coffee mugs to temporary tattoos. It's all so exciting!
Now if only I could find the time to try out all of these ideas!

Do you have any Silhouette projects that you love??

Tuesday, January 17, 2012

Valentine window

Do you remember my $10 window pane from Round Top?
It looked like this for Christmas.

But this weekend I wiped off the "JOY" and painted something more Valentine's-y.
It's a sweet and simple 30 minute project.
I printed off LOVE in a font that I liked and positioned it on the top left corner of the window.
I wanted the word to look a little more whimsical, so with a black sharpie I extended the lines and curve of the L and V.
I then printed off 2 pictures of birds that I found online (rest assured, I did NOT draw that bird!). The 2nd bird is on the other side of the paper and too faint to see here. I then penciled in a VERY basic branch for the 2 birds to sit on. I didn't have a large enough piece of paper to cover the window, so that's why all of these pages are taped together. Not the most professional way of doing things, but it got the job done!
I taped everything down on THE FRONT of the window, before flipping it over.
Then, on THE BACK, I used pink and brownish-grey paint to trace the outline of the picture. I let it dry for 10 minutes and then used a 2nd coat so that it wouldn't look translucent. I'm baffled that you can't see the 2nd bird in this picture. I swear it's there!
There it is! 2 sweet love birds :)
I like it so much that I'm actually sad that I'll have to take it down after Valentine's Day. Maybe I can just erase the LOVE? I'm not sure.
Any thoughts??

Tuesday To Do Party


LinkWithin

Related Posts with Thumbnails