Wednesday, August 31, 2011

Fun Fonts {Part Two}

Like I said in my last fonts post... I'm a font junkie!! So, I couldn't just have one post about cute fonts {and I may not stop at two!}.


Get it HERE


Get it HERE


Get it HERE


Get it HERE


Get it HERE
Happy downloading!!


Friday, August 26, 2011

Making Blogger photos BIGGER!

I'm here to share a quick tip with you today on how to make the photos you post in Blogger BIGGER.

First things first... Upload your photos into your post.
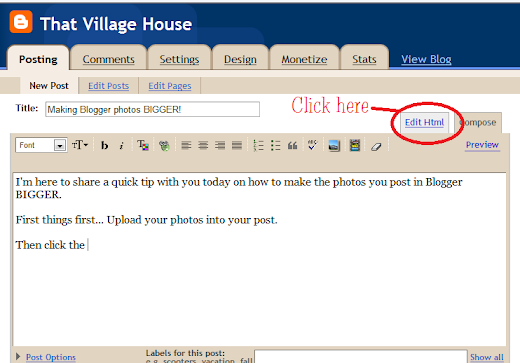
Then click the Edit HTML tab.

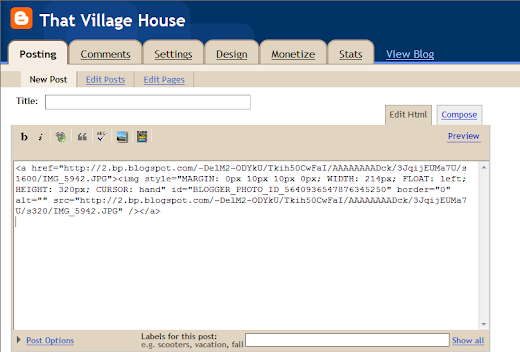
If you've uploaded a photo you should see something like this.
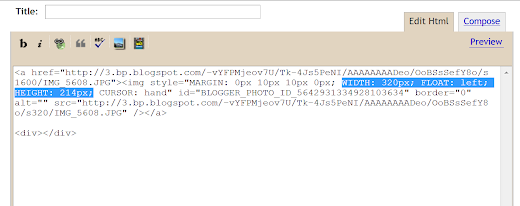
Find the text shown below in the highlighted area & delete.


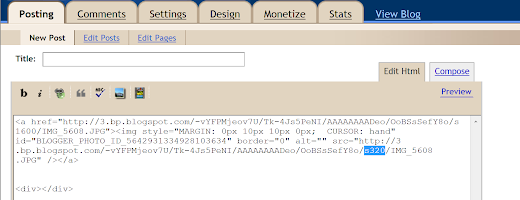
Next change the area shown below in the highlighted area to read s520 (you may need to adjust this depending on your margin area that you've got going on in your blog layout. I started with s420 and kept increasing the number until it was the size I wanted).

That's it! You should now see larger pictures when you post your blog (or when you click back over to the compose tab).

Good luck and hopefully this helps you out!


Thursday, August 25, 2011

DIY Cafe Shelves...Ballard Knock Off

Remember last week when I told you I'd figured out what would go on my long blank wall in the kitchen? Well, here they are!!

I was inspired by some pictures on other blogs like this one and this one and some photos on pinterest to build my own knock-off Ballard Designs cafe shelves. I'm here today to share with you how I did it!

Let's remember what I was starting with... {sorry for the dark photo}

I used painters tape to measure out how long I wanted the shelves to be and about where I wanted them to hang so I could live with it for a few days to make "sure" that's what I wanted to do.


Once I was decided it was off to buy my lumber.

I decided on one 3' and one 4' shelf.

So, I bought a 8' long 1x8. I purchased door casing for the trim. I knew I'd need 7' for the fronts of the two shelves and about 8" for each end. At Home Depot you can purchase the trim by the foot so you can buy just the amount you will actually need. I think they come in 12' long strips. I found two that were already cut and in more manageable lengths.

I also picked out four corbels for my shelves to mount on. These were about $6 and the most expensive part of the shelves. I've seen other bloggers mentioning buying 2 for $5, but I didn't find those. :(


The first thing I did was use my mitre saw to cut the 1x8 into my two desired lengths... 4 ft & 3 ft.

Then I measured my door casing along the edge of the 1x8 and marked where I wanted the BOTTOM of the moulding to stop.


I set my mitre saw to a 45 degree angle and cut my wood.

**Important to know***
Cut your wood like THIS...


NOT like this...


I made that mistake and couldn't figure out why it wasn't working. Laying the moulding flat will give you a great photo frame...but not a box which is basically what you're building.


I used wood glue along the backside of the moulding and used my nail gun to secure it to the shelf. The door moulding I bought (and probably they all have this) had an inset ridge that my 1x8 fit nicely into. See below how I did my moulding.

You could butt the moulding right to the top of the shelf, but I preferred to have a little lip on mine.


Your corners may not be perfect. That's what wood filler is for!
To get these corners you'll have to figure out which direction your wood needs to go and adjust your mitre saw accordingly. When I marked the wood I also made a pen mark diagonally in the direction I wanted the wood to go. That way when I cut my wood I could see the line and make sure my blade was going to cut in the direction I needed to match up with the other piece to make a corner. I definitely made more cuts than necessary all because I messed up the angles and measurements.


Once you have all the pieces cut and nailed together you'll be left with something like this.

Now the fun part... painting (UGH!)... I dislike painting the most. :)

Once it was painted and dried I chose to hang the corbels on the wall FIRST.


When both were hung on the wall and we had them leveled out we just screwed through the shelf into the corbel.


And VOILA!


Then came the truly hard part for me... Decorating them.


I'm really happy with how they turned out!! The total cost was about $47 for two shelves. Not bad when this look would have cost me $189 plus tax and shipping at Ballard.


Linked up here:
Somewhat Simple


Wednesday, August 24, 2011

Fun Fonts {Part One}

I'm a font junkie. I love them!!

I can remember the time when I was first married and I discovered free font websites you could download.

I would annoy (I'm sure!!) my husband by calling from the back bedroom "OH MY GOSH, there's a Krispy Kreme font! OH WHOA, there's a Disneyland font!!"

Seriously, it became an addiction for a while. Once my hubby showed me how to unzip files and install the fonts it was a slippery slope from then on.

I do some graphic design here and there with invitations and such so I use fun fonts all the time. I thought I'd share with you today just a few of my favorites and give you the link to where you can find them. I am a cheapo so all of these were free downloads. Hope you enjoy!!

Find it here

Find it here

Find it here

Find it here

Find it here

Find it here


Tuesday, August 23, 2011

Bow Organizer {Take Two}

I am FINALLY happy with the bow organizer for my sweet girls. I blogged about the first one I made last fall. It served it's purpose, but wasn't ever what I had intended it to look like.

I took the old one apart and was left with the original frame.

I spray painted it using my handy adapter so my pointer finger doesn't revolt on me. You can get these for a couple bucks at Walmart or other hardware stores. I don't spray paint without one of these anymore!

I bought this chicken wire from Home Depot. It was under $7 for a 10' long roll. I stretched the wire across the backside of my frame and cut it to size using my floral wire cutters. Using a staple gun I then attached it to the backside of the frame.


Then it was off to pick the spot.


And gather the bows!


The "roughing" up was unintentional, but the frame was in pretty bad shape and the spray paint was the cheapo kind we already had on hand. Once I sanded down the edges it made the other imperfections look intentional... just the way I like it. Like Peewee Herman said "I meant to do that"!
No, if only ALL the bows for the girls actually fit on here. I guess I'll need another one. How do you organize and store your bows? I'd love to know!! Please, share with us in the comments section.


Monday, August 22, 2011

Photography tips!

Is your camera stuck on automatic?? Mine is.
I have this nice new camera that I don't know how to use.
If you want to learn how to use your camera, check out this website.
Marla does a great job of simplifying things! I'm reading up & taking notes!

LinkWithin

Related Posts with Thumbnails